If you’ve ever wondered how to use a carpet stretcher, you’re in luck! In this article, we’ll dive into the ins and outs of this handy tool and show you step-by-step how to make the most of it. Whether you’re a DIY enthusiast or a professional carpet installer, mastering the art of using a carpet stretcher can make your life a whole lot easier. So, let’s roll up our sleeves and get started!
Using a carpet stretcher may seem daunting at first, but fear not! We’ll break it down for you in simple terms and guide you through the process. From understanding the different parts of a carpet stretcher to knowing how to position it properly, we’ve got you covered. By the end of this article, you’ll have the confidence and knowledge to use a carpet stretcher like a pro. So, let’s get ready to stretch those carpets and transform your space into a cozy oasis!
Now that we’ve set the stage, let’s jump right in and explore the fascinating world of carpet stretching. Whether you’re a seasoned professional or a curious DIYer, this article will equip you with the skills and know-how to use a carpet stretcher effectively. Get ready to level up your carpet installation game and achieve flawless results every time. So, grab your carpet stretcher and let’s make magic happen!
- Start by removing any furniture or obstacles from the area where you’ll be stretching the carpet.
- Position the carpet stretcher at one end of the room, with the toothed end against the wall.
- Engage the stretcher’s teeth into the carpet about six inches from the wall.
- Extend the lever on the stretcher to stretch the carpet towards the opposite wall.
- Repeat the process along the length of the room, ensuring the carpet is stretched tightly.
- Trim any excess carpet using a carpet knife and secure the edges with a carpet trimmer.
How to Use a Carpet Stretcher?
Carpet stretching is an essential part of maintaining the appearance and longevity of your carpets. If you have noticed wrinkles, bumps, or unevenness in your carpet, using a carpet stretcher can help you fix these issues. A carpet stretcher is a tool specifically designed to stretch out the carpet and eliminate any imperfections. In this article, we will guide you on how to use a carpet stretcher effectively to achieve professional-looking results.
Step 1: Prepare the Area
Before you start using the carpet stretcher, it’s important to prepare the area properly. Clear the room of any furniture or obstacles that may hinder your progress. Vacuum the carpet thoroughly to remove any dirt or debris that could interfere with the stretching process. It’s also a good idea to inspect the carpet for any damages or tears that may need to be repaired before stretching.
Next, you’ll need to determine the direction in which you want to stretch the carpet. This can be influenced by the layout of the room and the position of the seams. It’s generally recommended to stretch the carpet towards the longest wall or the direction of natural light to minimize the visibility of seams.
Step 1.1: Gather the Necessary Tools
Before you begin stretching the carpet, make sure you have all the necessary tools at hand. Apart from the carpet stretcher, you will need a knee kicker, a carpet knife, a pry bar, and a staple gun. It’s also a good idea to have extra carpet adhesive and padding in case you encounter any issues during the stretching process.
Step 1.2: Secure the Carpet Edges
To prevent any damage to the edges of the carpet, it’s important to secure them before stretching. Use a pry bar to lift the edges and insert small wooden shims underneath. This will create a gap between the carpet and the wall, allowing you to stretch the carpet without causing any tears or fraying.
Step 2: Use the Knee Kicker
The knee kicker is a valuable tool that helps you stretch the carpet in smaller areas or corners where the carpet stretcher may not fit. Start by positioning the knee kicker about six inches away from the wall and kick the padded end with your knee in a swift motion. This will push the carpet towards the wall and create tension, allowing you to stretch it effectively.
Continue using the knee kicker along the perimeter of the room, making sure to maintain even tension throughout. Pay special attention to corners and tight spaces, as these areas may require extra stretching to eliminate any wrinkles or bumps.
Step 2.1: Adjust the Carpet Stretcher
Once you have used the knee kicker to stretch the carpet along the edges, it’s time to bring in the carpet stretcher for larger areas. Adjust the length of the carpet stretcher according to the width of the room. Most carpet stretchers have an adjustable head that allows you to control the amount of tension applied to the carpet.
Step 2.2: Stretch the Carpet
Position the carpet stretcher about six inches away from the wall and push the lever down to engage the stretching mechanism. Slowly move the carpet stretcher towards the opposite wall, applying even pressure to stretch the carpet. As you move, listen for the clicking sound, which indicates that the carpet is being stretched properly.
Repeat this process along the length of the room, making sure to overlap each stretch by a few inches to ensure uniform tension. If you encounter any obstacles such as doorways or vents, use the knee kicker or a smaller carpet stretcher to stretch these areas.
Step 3: Trim and Finish
Once you have stretched the carpet to your satisfaction, it’s time to trim off any excess material and finish the edges. Use a carpet knife to carefully cut along the baseboards, following the contour of the wall. Be cautious not to cut into the wall or the carpet padding.
After trimming, tuck the edges of the carpet under the baseboards using a putty knife or a pry bar. This will create a clean and seamless finish. If necessary, secure the edges with a staple gun or carpet adhesive.
Finally, inspect the entire carpet surface for any remaining wrinkles or imperfections. If you notice any areas that require further stretching, repeat the process using the carpet stretcher and knee kicker until the carpet is smooth and even.
Benefits of Using a Carpet Stretcher
Using a carpet stretcher offers several benefits beyond just improving the appearance of your carpets. Here are some key advantages:
1. Enhanced Durability: By stretching your carpets, you remove any excess material and eliminate the risk of tripping or snagging on loose carpet fibers.
2. Improved Lifespan: Regularly stretching your carpets helps prevent premature wear and tear, extending their lifespan and saving you money in the long run.
3. Enhanced Aesthetic Appeal: A properly stretched carpet looks more visually appealing and professional, enhancing the overall appearance of your space.
4. Increased Comfort: Eliminating wrinkles and bumps in your carpet creates a smoother surface, providing a more comfortable walking experience.
5. Reduced Allergens: Stretching your carpets allows for better airflow, reducing the accumulation of dust, allergens, and mold beneath the carpet.
Using a carpet stretcher is a straightforward process that can be easily mastered with practice. By following the steps outlined in this article, you can achieve professional results and enjoy the numerous benefits of a perfectly stretched carpet. So, grab your tools and get ready to transform your carpets!
Key Takeaways: How to Use a Carpet Stretcher?
- Make sure the carpet is clean and free of debris before stretching it.
- Position the carpet stretcher at one end of the room and hook it onto the carpet.
- Use the lever to push the carpet stretcher forward, stretching the carpet as you go.
- Repeat the process on the other side of the room to ensure even stretching.
- Trim any excess carpet and secure it to the floor with a carpet tool.
Frequently Asked Questions:
1. How do I set up a carpet stretcher?
Setting up a carpet stretcher is a crucial step in ensuring a successful carpet installation. Here’s how you can do it:
First, make sure to clear the area where you’ll be working. Remove any furniture or obstacles from the room. Next, unroll the carpet and position it in the desired location, leaving some excess on the edges. Attach one end of the carpet to the tack strip by using a knee kicker or a carpet awl.
2. How do I adjust the tension on a carpet stretcher?
Adjusting the tension on a carpet stretcher is essential for achieving a tight and wrinkle-free carpet installation. Follow these steps:
Start by positioning the stretcher on the opposite side of the room from where you initially attached the carpet. Extend the stretcher’s head as far as possible, making sure it’s resting against the baseboard. Engage the lever to lock the stretcher in place. Then, use the lever to apply tension to the carpet, gradually stretching it towards the opposite wall. Repeat this process until the desired tension is achieved.
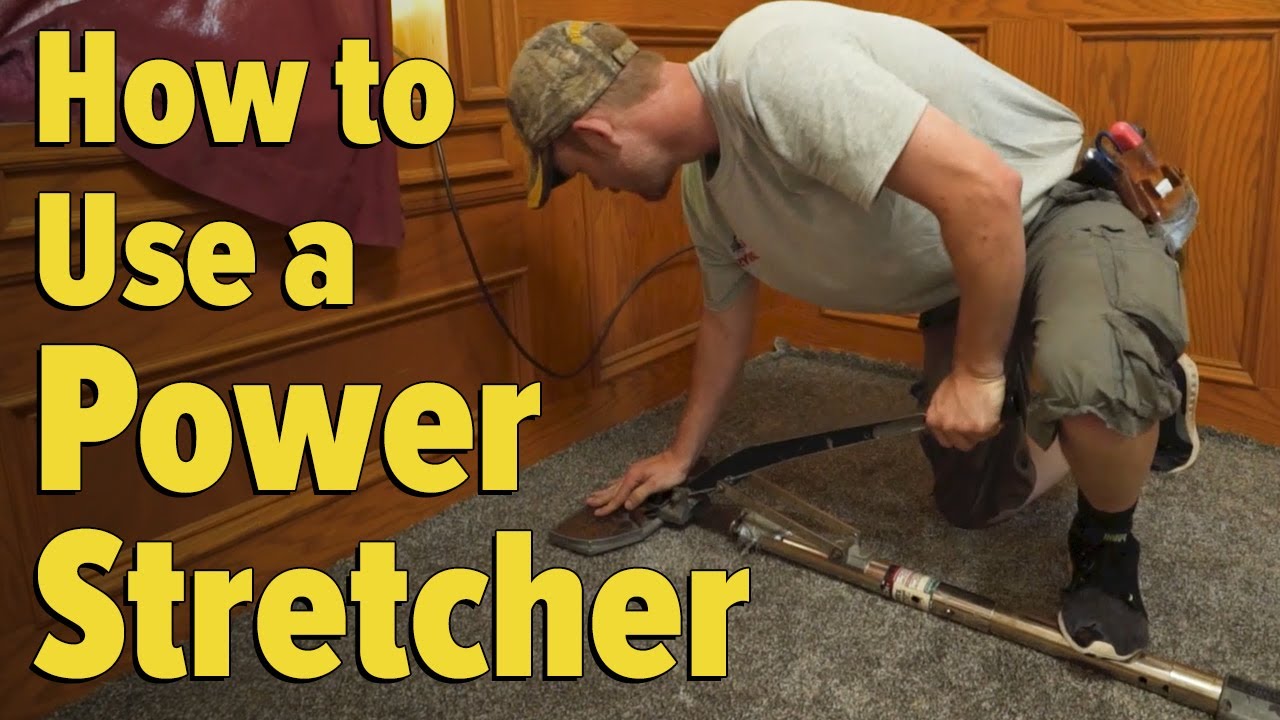
3. How do I use a power stretcher?
A power stretcher is a useful tool for stretching carpets over larger areas. Here’s how you can use it:
Begin by positioning the power stretcher at one corner of the room, aligning it with the edge of the carpet. Insert the power stretcher’s teeth into the carpet’s backing and engage the trigger mechanism to apply tension. Slowly move the power stretcher across the room, stretching the carpet as you go. Repeat this process until the entire carpet is properly stretched and secured.
4. What precautions should I take when using a carpet stretcher?
While using a carpet stretcher, it’s important to take certain precautions to ensure your safety and the quality of the installation:
Always wear protective gloves and knee pads to prevent injuries. Make sure to clear the room of any sharp objects or debris that may damage the carpet. Additionally, be cautious when applying tension with the stretcher to avoid overstretching and causing damage to the carpet or the floor beneath.
5. How do I finish the carpet installation after using a stretcher?
Once you have successfully stretched the carpet using a carpet stretcher, it’s time to finish the installation:
Trim any excess carpet along the edges using a carpet knife. Make sure to leave a little extra carpet for tucking into the baseboard. Use a carpet tucker or a putty knife to push the carpet into the gap between the tack strip and the wall. Finally, use a carpet trimmer or a utility knife to neatly trim the excess carpet, creating a clean and professional finish.
Carpet Power Stretcher Demonstration
Final Thoughts on How to Use a Carpet Stretcher
Now that you’ve learned the ins and outs of using a carpet stretcher, you’re well-equipped to tackle your carpet installation project with confidence. Remember, a carpet stretcher is an essential tool that ensures a professional and long-lasting finish. By following the steps outlined in this guide, you’ll be able to stretch your carpet effectively and avoid any unsightly wrinkles or bunching.
Using a carpet stretcher may seem intimidating at first, but with practice and the right techniques, you’ll become a pro in no time. Start by preparing your room, including removing any furniture and ensuring the subfloor is clean and smooth. Then, gradually stretch the carpet across the room, making sure to secure it tightly to the tack strip. Finally, trim any excess carpet and finish the edges with a carpet knife and a knee kicker.
With these skills in your arsenal, you’ll be able to transform your space with a beautifully installed carpet that not only looks great but also stands the test of time. So, grab your carpet stretcher and get ready to create a cozy and comfortable environment in your home or office. Happy carpet stretching!