Are you looking to install a carpet without a stretcher? Well, you’re in luck! This article will walk you through the process. Whether you’re a DIY enthusiast or just looking to save money, this method is a great alternative that can yield professional results. So, let’s dive in and discover step-by-step instructions on installing carpet without a stretcher.
Installing a carpet without a stretcher may seem daunting, but it can be a breeze with the proper techniques and tools. We’ll show you how to achieve a smooth and snug carpet installation using simple household items like a knee kicker and a carpet trimmer. We’ll cover everything from preparing the subfloor, stretching the carpet, and trimming the excess. So, if you’re ready to tackle this project and give your space a fresh look, let’s start installing carpet without a stretcher!
- Start by thoroughly cleaning and preparing the floor.
- Measure the room and cut the carpet accordingly, leaving excess on all sides.
- Apply carpet adhesive or double-sided tape along the edges of the room.
- Carefully lay the carpet flat and smooth out any wrinkles or bubbles.
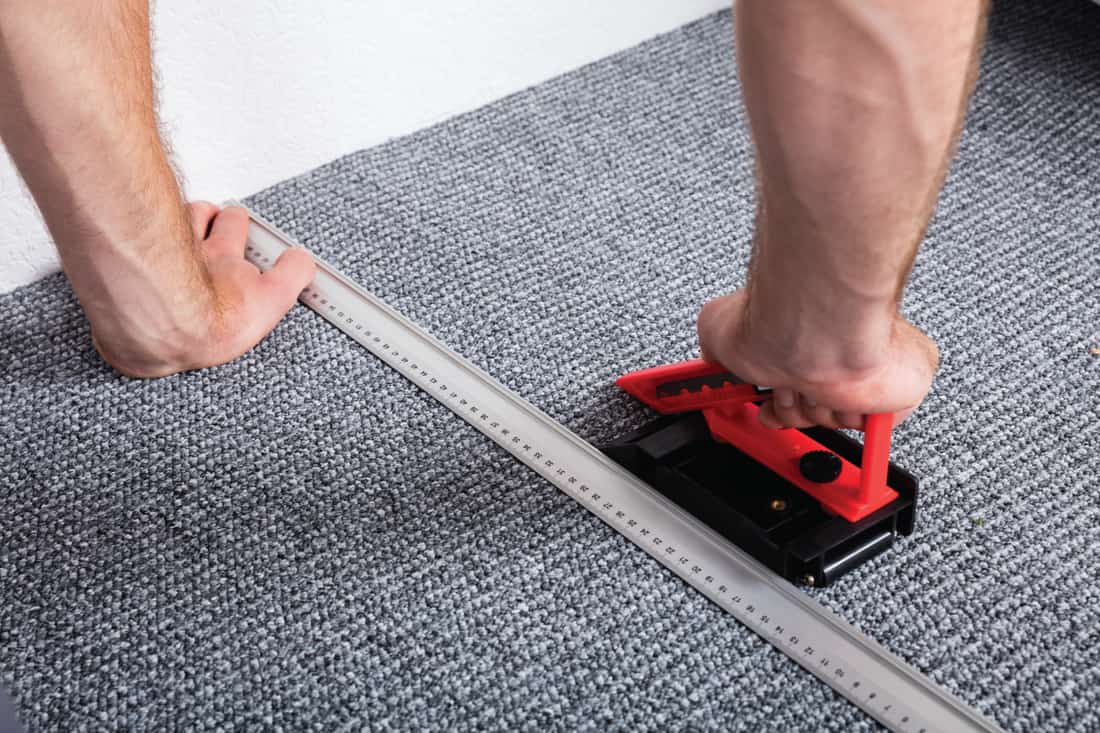
- Use a carpet or knee kicker to stretch the carpet toward the walls.
- Trim any excess carpet and secure it firmly against the walls using a carpet tucker.
With these simple steps, you can install carpet without a stretcher and achieve a professional-looking result.
How to Install a Carpet Without a Stretcher?
Installing a carpet without a stretcher may seem challenging, but it can be done effectively with the proper techniques and tools. Whether you’re a DIY enthusiast or a professional looking for alternative methods, this article will guide you. By following these steps, you’ll be able to achieve a smooth and professional-looking carpet installation without using a stretcher.
Step 1: Gather the Necessary Tools
Before you begin the installation process, gathering all the necessary tools is essential. While you won’t be using a stretcher, there are other tools you’ll need to ensure a successful installation. Some of the basic tools include:
1. Knee kicker: This tool will be your primary alternative to a stretcher. It helps to stretch the carpet and secure it in place.
2. Carpet adhesive: Using adhesive is crucial to ensure that the carpet sticks firmly to the floor.
3. Carpet knife: You’ll need a sharp knife to cut the carpet accurately.
4. Seam tape: Seam tape is necessary to join carpet pieces.
5. Tack strips: Tack strips secure the carpet around the room’s edges.
Step 1.1: Preparing the Subfloor
Before installing the carpet, it’s essential to prepare the subfloor properly. Start by removing any existing carpet, padding, or debris from the floor. Vacuum the subfloor thoroughly to ensure it’s clean and free from dust. Repair any damaged areas and ensure the subfloor is flat and smooth. This will create a solid foundation for your carpet installation.
Step 1.2: Measuring and Cutting the Carpet
Measure the room carefully, accounting for any irregularities or obstacles. Add a few inches to each measurement to allow for trimming and fitting. Lay the carpet and mark the measurements on the back using chalk or pencil. Use a sharp carpet knife to cut the carpet along the marked lines. Take your time to ensure precise cutting for a seamless installation.
Step 2: Installing the Tack Strips
Tack strips are essential for holding the carpet in place around the room’s edges. Begin by installing the tack strips along each wall, leaving a small gap between each strip and the wall. Make sure the pins on the tack strips face the wall. Use a hammer to secure the strips firmly to the floor. Repeat this process for each wall, ensuring the strips are evenly spaced.
Step 2.1: Applying the Carpet Adhesive
To ensure proper adhesion, apply carpet adhesive to the subfloor using a trowel. Spread the adhesive evenly, working in small sections at a time. Avoid excessive adhesive, as it can seep through the carpet fibers and create a messy appearance. Follow the manufacturer’s instructions for drying time and any additional steps required for your specific adhesive.
Step 2.2: Stretching and Securing the Carpet
Using a knee kicker, start at one corner of the room and position the carpet against the tack strips. Push the carpet into place and stretch it towards the opposite wall, making sure it is taut and smooth. Trim any excess carpet along the edges with a carpet knife. Continue this process for the remaining sides of the room, ensuring the carpet is securely attached to the tack strips.
Step 3: Joining Carpet Pieces
If your room requires multiple carpet pieces, you must combine them seamlessly. This can be achieved using seam tape and a carpet iron. Place the seam tape along the edge of one carpet piece and position the second piece over it. Use a carpet iron to apply heat to the seam tape, activating the adhesive and bonding the carpet pieces together. Trim any excess carpet and ensure the seam is smooth and invisible.
Step 3.1: Final Touches and Finishing
Inspect the entire carpet installation to ensure it is smooth and secure. Using a carpet knife, trim any stray fibers or uneven edges. Use a carpet brush or roller to ensure the carpet is firmly pressed against the tack strips and adhesive. Vacuum the carpet thoroughly to remove any loose fibers or debris. Finally, any furniture or fixtures that were moved during the installation process should be replaced.
Installing a carpet without a stretcher may require more effort, but you can achieve professional results with the right tools and techniques. Following these steps and paying attention to detail, you can install a carpet without a stretcher and enjoy a beautifully finished room. Remember to take your time, measure accurately, and ensure each step is done precisely for the best outcome.
Key Takeaways: How to Install a Carpet Without a Stretcher?
- Carpet tiles can be installed without a stretcher by using double-sided carpet tape.
- Measure the area carefully and cut the carpet tiles to fit.
- Start in one corner and peel off the backing of the carpet tape, then press the tile firmly onto the floor.
- Continue placing the tiles, making sure they are correctly aligned.
- Use a carpet roller to press down on the tiles and ensure they are securely adhered to the floor.
Frequently Asked Questions
Question 1: Can I install a carpet without using a stretcher?
Yes, it is possible to install carpet without a stretcher, although using a stretcher is recommended for achieving the best results. However, alternative techniques can be used if you don’t have a stretcher.
One method is using a knee kicker designed explicitly for carpet installation. This tool allows you to stretch the carpet using your knee and a kicking motion. While it may not provide the same level of tension as a stretcher, it can still be effective for smaller areas or temporary installations.
Question 2: What are the steps for installing a carpet without a stretcher?
To install carpet without a stretcher, follow these steps:
1. Prepare the room by removing any existing carpet or flooring.
2. Clean the subfloor thoroughly to ensure a smooth surface for the carpet.
3. Roll out the carpet in the room and position it as desired.
4. Use a knee kicker to stretch the carpet along one edge, starting in the middle and working towards the corners.
5. Secure the carpet in place using carpet tacks or adhesive.
6. Repeat the stretching and securing process for each carpet edge.
7. Trim any excess carpet along the edges using a sharp utility knife.
Always read and follow the manufacturer’s instructions for the specific type of carpet you are installing.
Question 3: Are there any disadvantages to installing a carpet without a stretcher?
While it is possible to install carpets without a stretcher, some disadvantages exist. Without a stretcher, achieving a tight and even stretch across the entire rug may be more challenging, resulting in wrinkles or sagging over time.
Additionally, alternative methods, such as a knee kicker, may require more physical effort and can be tiring on the knees and legs. It is also important to note that without a stretcher, you may not achieve the same professional-looking results as you would with one.
Question 4: Can I rent a stretcher for carpet installation?
Many home improvement stores and rental centers rent carpet stretchers. This can be cost-effective if you only need it for a one-time installation or prefer to use professional-grade tools for the best results.
Before renting a stretcher, please familiarize yourself with its operation and safety guidelines. Measure your room and determine the size and type of stretcher you will need for your specific carpet installation.
Question 5: What other tools can I use for carpet installation without a stretcher?
In addition to a knee kicker, there are a few other tools that can be used for carpet installation without a stretcher:
1. Carpet tape: This double-sided adhesive tape secures the edges of the carpet to the subfloor. It is a quick and easy alternative to tacks or adhesives.
2. Power stretcher: If you have access to a power stretcher, you can stretch the carpet more efficiently and effectively without a traditional stretcher. Professionals often use this tool for larger carpet installations.
Remember always to use caution and follow proper safety guidelines when using any tools for carpet installation.
Stretching Carpet Without a Carpet Stretcher: Carpet Installation & Help
Final Summary: A Creative Solution for Carpet Installation
So there you have it, a step-by-step guide on how to install carpet without a stretcher. Who would have thought such a task could be accomplished without the traditional tools? But with creativity and resourcefulness, you can achieve professional-looking results right in your home.
Using alternative methods like double-sided carpet tape or the knee-kicker tool can save time and money while achieving a secure and flawless installation. Remember to prep your space correctly, measure accurately, and take time during installation to ensure a smooth and beautiful finish.
Installing a carpet without a stretcher may seem daunting, but with the proper knowledge and techniques, you can confidently tackle it. So transform your space with a cozy rug that adds warmth and comfort to your home. Get creative, think outside the box, and enjoy the satisfaction of a job well done!